Overview
Microsoft SQL Server customers will need to perform a few additional steps after installing m-Power in order to connect to their SQL Server database. This post will walk you through the needed steps to finish the installation.
First, you will need a JDBC driver file to connect to the SQL Server instance. Additionally, a few SQL Server configuration settings need to be enabled in order for m-Power to communicate with the database.
Also note, m-Power will connect to the database via SQL Server Authentication. The setup/configuration of m-Power requires a SQL Server Admin User in order to generate the necessary metadata on the database. Subsequently, all developers will need to be set up as database users in order to sign into the interface.
Configuration
There are a few required configurations which must be done in order to connect SQL Server to m-Power. Only once the required configurations are done can the optional configurations be pursued.
Required Configuration
- Installing the JDBC Driver
- Configure m-Power SQL Server Properties
- Enabling TCP/IP
Optional Configuration:
- Active Directory Runtime Setup
- Active Directory Interface Signin
- Integrated Security
Installing the JDBC Driver
Follow these instructions to download and install the driver.
- Open the driver download page for Microsoft here.
- Click “Download Microsoft JDBC Driver 11.X for SQL Server (zip).
- Unzip the folder to the desktop (or anywhere of your choice).
- Open the new sqljdbc_11.X.X.X_enu folder > sqljdbc_11.X > enu
- Move the mssql-jdbc-11.2.1.jre11.jar file into /m-power/tomcat/lib. (Note: You will need to move this file into development and production.)
- Restart Tomcat.
Configure m-Power SQL Server Properties
Various m-Power files will need to be setup correctly to ensure a connection can be made.
File: ms_sqlserver_driver.properties
Location: m-power/proddata/conf/
Edit this file in a text editor (mrc recommends Notepad++) and verify that the connection_properties line is formatted as such:
connection_properties=SelectMethod\=Cursor;encrypt\=true;trustServerCertificate\=true;New installations of m-Power will already have this present, however older customers will need to add this manually.
File: mrc-spring-context.xml
Location: /m-power/mrcjava/WEB-INF/classes/
Edit this file in a editor and only if not already present, append the following to the end of any ms_sqlserver bean’s JDBC url:
;encrypt=true;trustServerCertificate=true; Repeat this process for the other mrc-spring-context.xml file in /m-power/mrcwebgui/WEB-INF/classes/.
Again, new installations of m-Power will already have this present, however older customers will need to add this manually.
Restart Tomcat after editing the mrc-spring-context.xml files.
Enabling TCP/IP
Once the driver has been installed and Tomcat restarted, you will need to confirm that the TCP/IP ports are open and enabled.
Open the Microsoft SQL Server Configuration Tools and then the SQL Server Configuration Manager. Under the SQL Server Network Configuration, select Protocols and SQLEXPRESS. Right click on TCP/IP and select Properties.
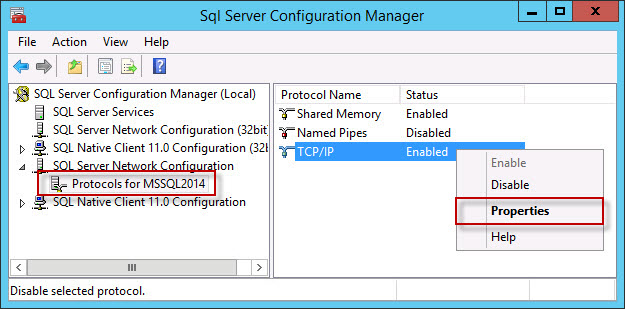
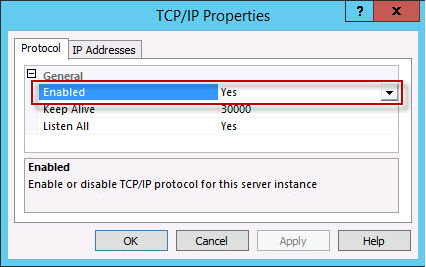
Under the Protocol tab, be sure that Enabled is set to Yes.
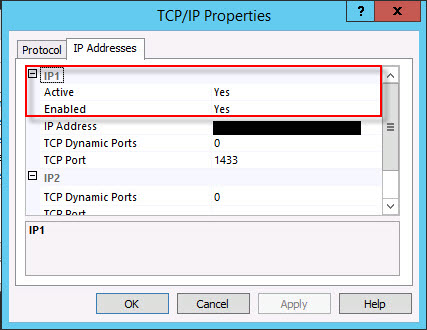
While still in the Properties window, click the IP Addresses tab and under IP1, change Active and Enabled both to Yes. Be sure the current IP address is listed under the IP Address.
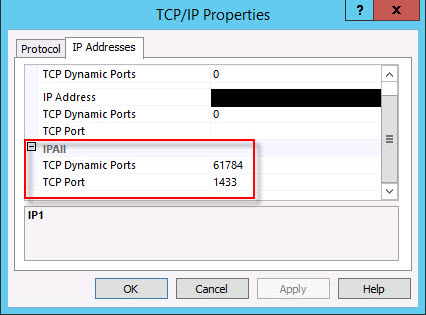
Scroll to the bottom and set the IPAll TCP Port to 1433.
Restart the MS SQL Service and Tomcat.
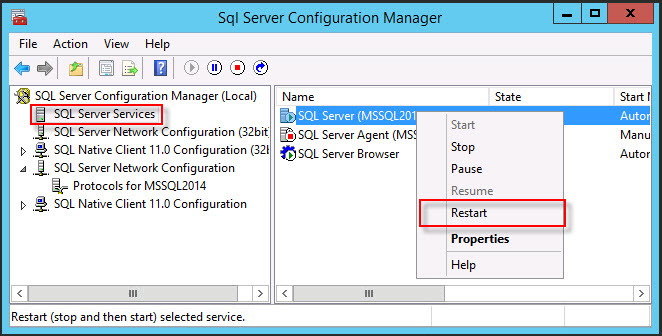
Once both services have been restarted, you may move onto the configuration of your m-Power installation using an admin SQL Server user.
Active Directory Interface Signin
As mentioned before, the m-Power interface login validates via the SQL Server authentication. This means all m-Power developers need to have a valid user setup on the database in order to sign in. If you wish to have only one admin database user and have your developers sign into the m-Power interface via their Windows Authentication/Active Directory, please follow these instructions:
After configuring m-Power with the admin database user, sign in with this database user.
Create your Active Directory users as m-Power developers. This is done within Admin(Menu) -> Developers ->Create New. When specifying the user profile, do not include the domain name. Instead, only enter the Login name. Ensure the username is entered in ALL CAPS.

Next, directly on the m-Power server edit the /m-power/proddata/conf/mrctool.properties file in Notepad++. Add the following two properties to the bottom of the file:
active_directory=true
active_directory_url=ldap://XX.XX.XXX.XXX:389;domain=mrc.test;search_base=DC=mrc,DC=test
The first property active_directory tells m-Power to validate by an Active Directory account rather than the traditional Database user account.
The second property active_directory_url tells m-Power the LDAP URL to your Active Directory server. Please make the following configurations to your URL string (ldap://XX.XX.XXX.XXX:389;domain=mrc.test;search_base=DC=mrc,DC=test) as necessary:
- Replace
XX.XX.XXX.XXXwith your Active Directory server address. - Replace
MYDOMAIN.comour Active Directory domain. - Add the necessary domain content values (DC=) to the
search_baseparameter. You may add as many domain content values as is necessary for your system (separated by commas).
Save your changes when done and restart Tomcat.
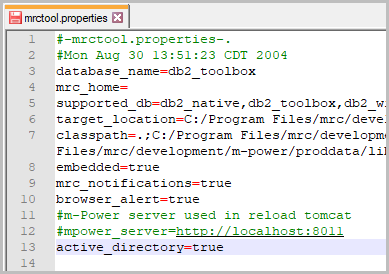
Once set up, save your changes and restart Tomcat.
You should now be able to log into the m-Power interface using a valid Active Directory user that has been also been set up as an m-Power developer. Be sure you are signing into the interface with only the username. Do not include the domain.
Note, the above steps are only for developers logging into the development interface. If wanting to have your end user/run-time security validation please use the instructions here to configure.
Also note, whether in the development environment or at run-time, any communication needed between m-Power and your MSSQL server will use the admin database user that was used to configure m-Power. If wishing to not use a database user at all, you can configure Integrated Security to have all development and run-time connections use an Active Directory user. Please proceed to the next section.
Integrated Security
Configuring Integrated Security will remove the need to specify an MSSQL database user/password in configuration files. Instead, you will point Tomcat to use an Active Directory account as the pooled connection user.
First, be sure you have completed the above steps to enable Active Directory Interface Login.
Download the Integrated Security authentication file here and install on the server’s C:\Program Files\java\jdk[version]\bin folder (Use the directory where the java folder is set up on your server).
Next, we will remove the MSSQL database user reference from the /m-power/mrcwebgui/WEB-INF/classes/mrc-spring-context.xml file:
- Find your existing ms_sqlserver1 connection.
- Within this bean, find and remove the elements for:
your_usernameyour_password - Find the jdbc url and append
;integratedSecurity=trueto the end of the value.
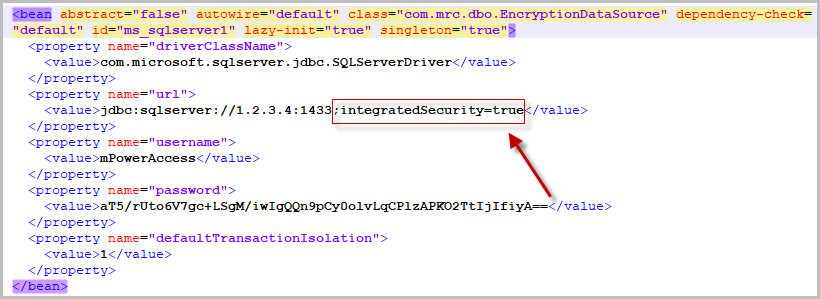
Once finished editing the mrc-spring-context.xml file inside of /m-power/mrcwebgui, it is time to edit your runtime file located in /m-power/mrcjava/WEB-INF/classes/mrc-spring-context.xml. You will need to repeat the steps referenced above.
The final step is that, since we are using Integrated Security and no user/password is defined in any spring context file, we need to configure a valid Active Directory to run Tomcat. This user and their credentials, will be used to facilitate all communication to the database.
- Open your Windows service panel and find the necessary Tomcat entry. Right click and select Properties:

- Switch to the “Log On” tab. Select the “This Account” radio. Browse to find the correct domain user and enter/confirm the password entry. Press Apply.
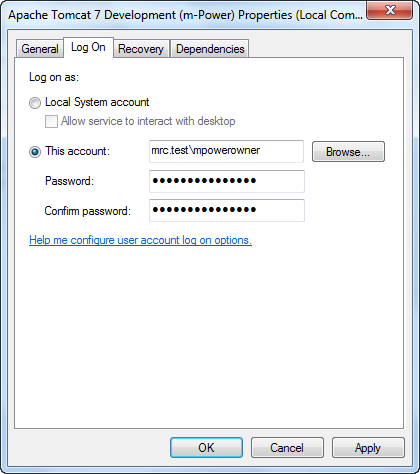
- Restart Tomcat.
Now all database connections will use the user credentials set here to communicate with m-Power.
