Overview
This post follows up the previous post titled, “CSS Tutorial: Style Sheet Types”. It is meant for CSS beginners who want to learn the basics of style sheet syntax, and how it interacts with HTML. If you haven’t read the previous post, it is important that you read it before this one.
You will find that style sheet syntax is relatively easy to learn, once you understand the basic principles. Style sheets establish rules that declare how certain elements are displayed on the webpage. Every style sheet rule has two parts: A selector and a declaration.
The Selector
The selector is connected to a particular style within the HTML. The selector defines which element will be affected by the declaration. Any element used in html can be a selector, such as ‘p’, ‘h1’, or ‘ul’
The Declaration
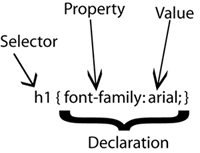
The declaration applies a style to the selector and is split up into two parts: property and value. The property is the aspect of the selector that is being defined. The value lays out the exact specification of the property.
Here is an example of the different parts that make up a rule:

Basic Rules
Look at the image above and you’ll notice a few basic rules to follow when using style sheets:
- The declaration is always wrapped in curly braces.
- The property is followed by a colon.
- The value is followed by a semi-colon
Grouping Properties
More often than not, you will want to declare a few properties for the same selector. Grouping properties follows the same format as above, and can be displayed like this:
h1 { font-family: arial; color: red; font-weight: bold; }</pre>
</div>
When defining multiple properties for the same selector, make sure that every value is followed with a semicolon.
Visual Formatting
When dealing with a selector containing multiple properties as shown above, it is good practice to lay out the code in such a way that is simple to read. Obviously, placing 5 properties on the same line can look messy and be difficult to read. The key to readability is proper use of white space. When using style sheets, white space is a matter of preference. You can add as little or as much space in between properties as you like. With that in mind, it is a good practice to place multiple properties on separate lines, like this:
p   {
     color: red;
     font-family: arial;
     font-weight: bold;
     background-color: blue;
     }
Do you see how much easier that is to read than a linear format? Just like HTML, it is important that you write clean code with CSS.
Grouping Selectors
Let’s say that you want a few different elements to have the same style. Rather than declaring each style separately, you can group similar selectors together and save space. Simply separate each selector with a comma, like this:
p, h1, th   {
               color: red;
               font-family: arial;
               background-color: blue;
               }
Conclusion
Using the fundamentals laid out above, below is an example of actual CSS code and the corresponding HTML.
<html>
<head>
<style type="text/css">
p  {
    font-family: arial;
    color: blue;
    background-color: gray;
    border: 2px solid black;
    font-weight: bold;
    width: 200px;
    }
</style>
</head>
<body>
<p>
This is blue text on a gray background.</p>
</body>
</html>
Click this link to see what that code would look like in a browser window.
This has been a basic overview of CSS syntax. I hope that you now have a good understanding of style sheet formatting, and how to lay out a basic style sheet. The next tutorial will detail two of the most commonly used aspects of CSS: Class and ID selectors.
