This document is designed to give system administrators step by step instructions on how to update to Tomcat 10 and JDK 17.
Before we begin, please note these instructions are designed for standard Windows installations. If you are utilizing any of the following, please consider engaging m-Power in a services agreements for us to do this conversion for you as we are familiar with these types of customized solutions:
- Load Balancing
- Clustering
- SSL
- mod_jk to communicate between Tomcat/Apache
- Custom Contexts
- Reverse Proxies
Step 1: Install JDK 17
- Download JDK 17 from Amazon Corretto.
- Run the Corretto installer.
- Restart the server.
Step 2: Active Directory Authentication File (optional)
If using Active Directory authentication, download the Integrated Security authentication file here and install in the following locations:
- C:\Program Files\Amazon Coretto\jdk17.X.XX_X\bin\
- C:\Program Files\Amazon Coretto\jdk17.X.XX_X\lib\
(Use the directory where the java folder is set up on your server)
Step 3: Remove Tomcat 9 Services
- Stop existing Tomcat services.
- Open CMD mode as Administrator.
- Navigate to C:\Program Files\mrc\development\m-power\tomcat\bin.
- Type
service remove TC9DEV - Navigate to C:\Program Files\mrc\development\m-power
Step 4: Install Tomcat 10
- Download the Windows version of Tomcat 10 from mrc here.
- Rename the existing \mrc\development\m-power\tomcat folder to tomcat9.
- Unzip the downloaded files into C:\Program Files\mrc\development\m-power. When completed you should have a C:\Program Files\mrc\development\m-power\tomcat folder.
- If you connect to MSSQL or MySQL, move over the necessary driver jar files from \tomcat9\lib to \tomcat\lib.

- Examine the server.xml in \tomcat9\conf. Specifically, note the shutdown port, connector port, and contexts. Ensure these changes are made within the server.xml in the new \tomcat\conf folder.


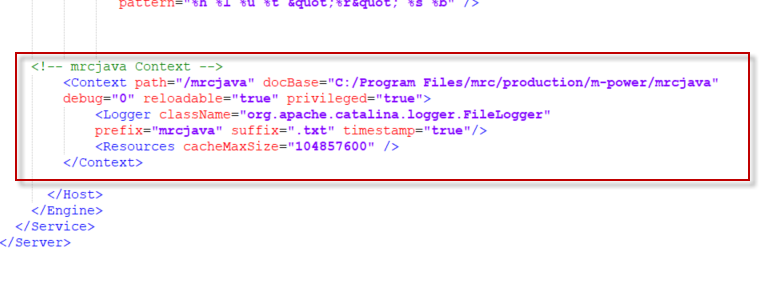
Production Specific server.xml Settings
- Towards the very bottom of the file, remove the entire “/webapp/mrc” context from the production server.xml. This context is only used for development environments and will cause problems in a production environment.
- Confirm the “/mrcjava” context is pointing to the correct production folder in the docBase parameter.
- Set the reloadable property to “false“.
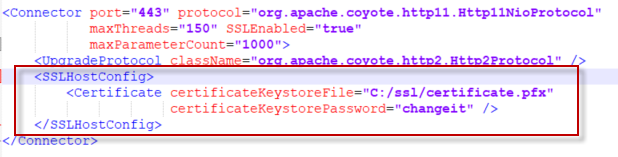
Tomcat 10 SSL Configuration (optional)
Tomcat 10 has a new setup for configuring SSL in the server.xml file. Find the main connector port and move the highlighted parameters into the nested SSLHostConfig tag as seen in the below screenshot.
Step 5: Install Tomcat 10 Services
- Open CMD mode as Administrator.
- Navigate to C:\Program Files\mrc\development\m-power\tomcat\bin
- Type
service install TC10DEVand press Enter. - When the service is installed, type
tomcat10w //ES//TC10DEVand press Enter. - In the General tab, ensure that the startup type is Automatic.
- In the Java tab set the JVM to the appropriate jvm.dll (found in a path similar to C:\Program Files\Amazon Corretto\jdk17.0.X_X\bin\server\jvm.dll
- Back in the General tab, press Start.
Step 6: Update m-Power
Download and install the October 2024 version of m-Power (or later) from here.
Step 7: Convert Apps to use Tomcat 10
- Open CMD mode as Administrator.
- Navigate to C:\Program Files\mrc\development\m-power\tomcat\lib.
- Run the following command
java -jar jakartaee-migration-1.0.8-shaded.jar "C:\Program Files\mrc\development\m-power\mrcjava\WEB-INF\classes" "C:\Program Files\mrc\development\m-power\mrcjava\WEB-INF\classes-out" - Rename the \m-power\mrcjava\WEB-INF\classes folder to classes_tc9.
- Rename the \m-power\mrcjava\WEB-INF\classes-out folder to classes.
- Restart development Tomcat.
Step 8: Production/Other Tomcat Environments
Repeat above steps 1 – 7 for your production environments (or any other Tomcat environments you have).
Step 9: Custom JAR Files (Optional)
If you have any custom projects developed by mrc that include custom JAR files, please contact us at support@mrc-productivity.com to obtain updated versions compatible with Tomcat 10 and JDK 17.
Non-Windows Installations
For Linux/iSeries m-Power installations, the steps are generally the same as above:
- Download and run the appropriate JDK 17 installer for your server.
- Restart the server after installing.
- Follow the above steps to Install Tomcat 10.
- Download and install the latest version of m-Power from here.
- Follow the above steps to Convert Apps to use Tomcat 10.
- Note: Navigate to your specific m-power folder as you will not have a C:/Program Files directory